
Integrating Jenkins with Git: A Step-by-Step Guide
Detailed explanation on how to connect Jenkins with Git
Website Visitors:With Pipeline as code, you store your Jenkins pipeline script in a file called JenkinsFile in your Git repository. When you update your pipeline code and push it to Git, it will trigger a build to Jenkins and Jenkins will automatically build your code. This is possible by connecting your Jenkins to Git. In this tutorial, we’ll demonstrate how to integrate Jenkins with GitHub using the Github plugin.
Connect Jenkins to Git
Jenkins supports Git as its version control system. Source code management (SCM) tools like Git allow developers to collaborate on projects more easily by sharing changes between multiple users.
Before you start connecting Jenkins to GitHub, you should install GitHub plugin in your Jenkins. Login to your Jenkins portal, navigate to Manage Jenkins, Manage Plugins, search for these plugins GitHub API Plugin, GitHub branch source, GitHub plugin and install them.
Configuring Jenkins for Git webHook
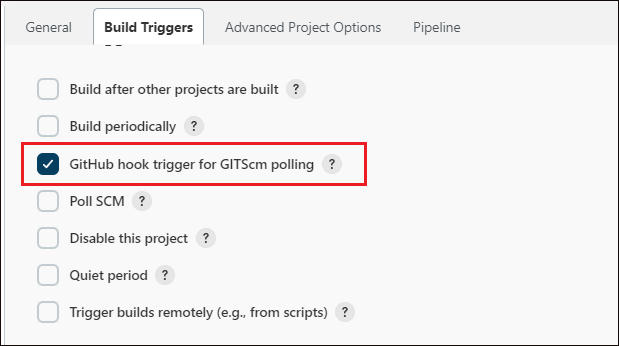
Login to your Jenkins portal, open your pipeline, and scroll down until you find Build Triggers option. Select the option for GitHub hook trigger for GITScm polling.
GitHub webhook trigger
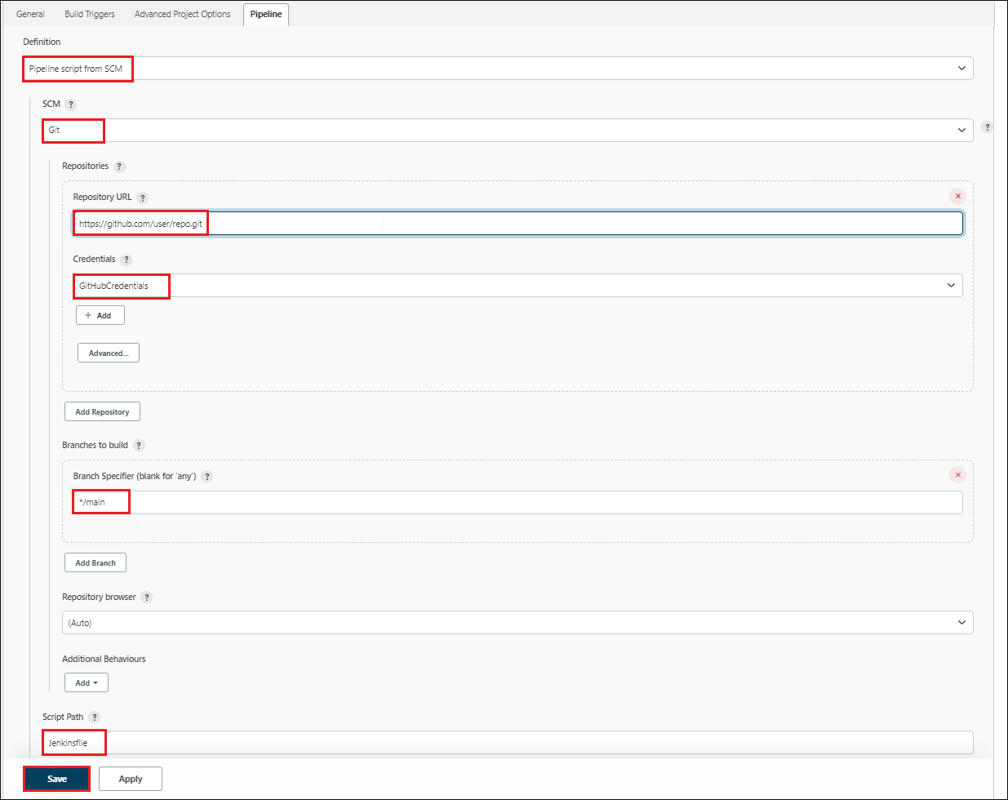
Next scroll down until you find pipeline definition.
-
Click the definition dropdown and select Pipeline script from SCM option.
-
Under SCM dropdown select Git.
-
Under Repository URL, copy your Git repository url and paste it here.
-
Add your Git credentials to your Jenkins and select them under credentials option.
-
Select the branch that you want to integrate with Jenkins.
-
In your Git repo, by default, Jenkins looks for a file called Jenkinsfile in the root of your repository in git. If Jenkinsfile is stored in a different folder, in the Script Path field, enter the path of the Jenkinsfile.
GitHub SCM details
Configuring Git repository details in Jenkins is complete. Let’s look at configuring GitHub with Jenkins details.
Connecting Git for Jenkins
Save your Jenkins pipeline script into a file called Jenkinsfile (case sensitive) and upload it in your git repository. In your Jenkins, you can then refer to that Jenkinsfile instead of having the actual code. This is called pipeline as code.

Jenkinsfile
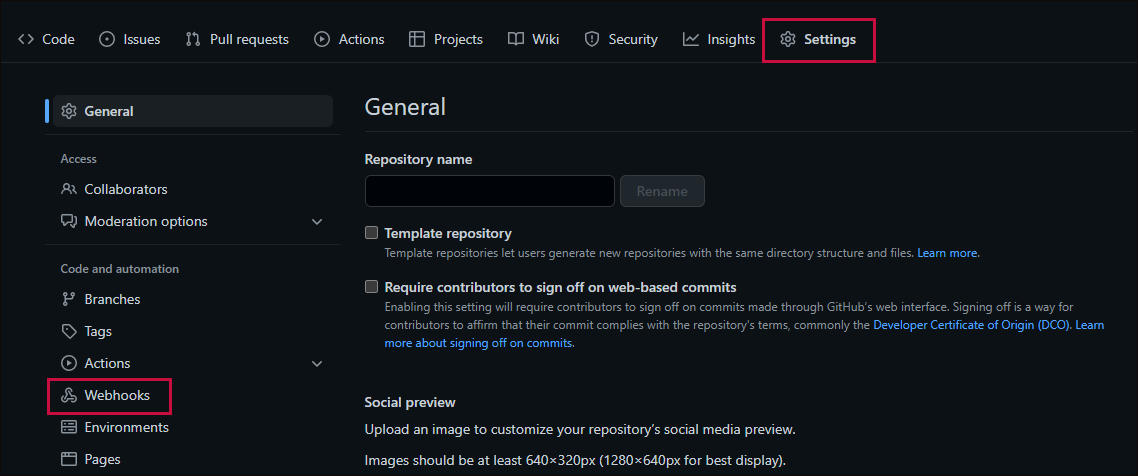
After you create the file, goto GitHub repository settings and click on webhooks option as shown below.
Displaying Webhooks option in Git repo settings
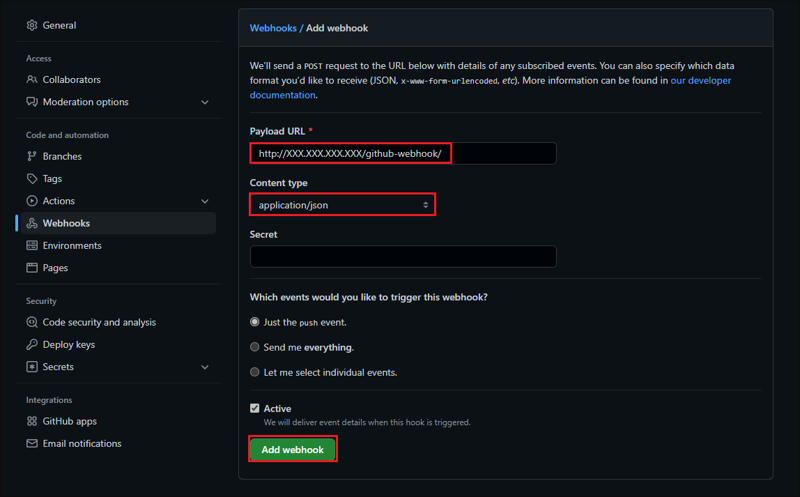
Next click on Add webhook. In the Payload URL section, enter your Jenkins public server ip/public dns name followed by /github-webhook/ as shown below:
http://xxx.xxx.xxx.xxx/github-webhook/
In the Content type select application/json and click on Add webhook option.
Creating Webhook
After webhook is created, Git will try to contact Jenkins URL and verify it. After validation is complete, a green tick mark is shown confirming the successful connection.
Congratulations!! you’ve made it. From hereon, any change made to the repository will automatically initiate a Jenkins build.
Suggested Article
Now that you know about connecting Jenkins to Git, continue reading our other article Jenkins variables and parameters here. All other DevOps categories are listed here: DevOps Tools. Have a look at the posts as per your topic of interest.
Conclusion
In this tutorial, we’ve explained how to connect your Jenkins server to Git so that any new changes to your Git repo invokes a Jenkins build automatically. We hope you have learned something new in this tutorial.
Please feel free to share your thoughts about this tutorial in the comments section below.
Your inbox needs more DevOps articles.
Subscribe to get our latest content by email.