
Understanding Jenkins Pipeline
Introduction to Jenkins Pipeline
Website Visitors:A quick and easy way to automate deployment and CI/CD is using Jenkins pipelines. There’s no excuse not to have a continuous delivery / continuous integration workflow in place! Learn how to easily set up Jenkins Pipelines today! In this tutorial, we’ll cover the basic definitions and syntax declarations for Jenkins Pipeline.
Jenkins Pipeline
Jenkins pipeline allows us to define all the steps that takes place in the application lifecycle. This includes build, testing, and deployment. We can use a set of plugins that helps us in implementing certain steps/processes as continuous delivery pipeline. The processes that would run in the pipeline are defined using groovy language code.
Jenkins Pipeline is a group of plugins that support implementing and integrating continuous delivery pipelines into Jenkins. A CD pipeline is an automated flow of your process/application for getting software from initial version control to your end users or customers. Any change to your software which is in source control, goes through series of steps (build, test and deployment) before it is released.
Jenkins pipeline is written following the domain-specific language (DSL) syntax. The definition of pipeline is written to a text file called JenkinsFile. When you integrate Jenkins with a source control system like Git, Jenkins looks for a file called Jenkinsfile in the Git repository you specify. Jenkinsfile is a text file that contains definition of Jenkins Pipeline and is checked into the application’s source control. For more information on Jenkinsfile, checkout this post: Connect Jenkins to Git
JenkinsFile supports two types of syntax: Declarative and Scripted as explained below.
Declarative syntax
Declarative pipeline is the most recent approach to pipeline-as-code 1 principle. This is very easy to write. In declarative pipeline we have pipeline block that contains the whole declaration of pipeline. This includes all processes like build, test, deploy. Inside the pipeline block we have agent, stages and steps sections. Let’s look at each of them in detail.
-
Pipeline - contains the whole pipeline.
-
Agent - Specifies the machine or the node on which the pipeline will run. We have few different parameters on how we can use agent.
-
Any - We’re specifying Jenkins can run the pipeline on any node. By default it will be the first available executor.
-
Label - If we need to specify our agent to run on a specific Operating System or machines with specific configuration, you’d name them accordingly and use that name as label in the pipeline script. Ex, label ‘ServerOS’
-
Docker - Runs pipeline on a container. If you need a new environment on every build step, you should use this parameter.
-
None - When using none, you don’t specify any node at the agent level, instead leave it to the stages. You can run each stage on different agent.
-
-
Stages - Contains stage and steps.
-
Stage - Specifies series of steps in the pipeline, ie., build, test and deploy processes on a stage.
- Step - Step is a single task that tells Jenkins what to do at a particular point in time. This is where you specify any programs, run scripts, commands etc that run on the nodes. You can run multiple commands on each step. Steps are defined within a stage block. Checkout this article for all allowed steps in Jenkins pipeline.
Sample declarative pipeline:
|
|
Scripted syntax
When Jenkins pipeline was introduced, scripted pipeline was the only option. Scripted pipeline is written only in Groovy language giving it more power and flexibility at the same time, making it hard for Jenkins admins to learn it and write. Scripted syntax has two blocks: node and stage. Let’s look at both of them in detail.
-
Node - Node is a machine which is already added to Jenkins master and is capable of executing a pipeline.
-
Stage - Stage defines the set of tasks performed through the pipeline (e.g. “Build”, “Test” and “Deploy” stages).
Sample scripted pipeline:
|
|
node {} it means it is a scripted pipeline. If it has pipeline {} it means it is declarative pipeline.If you are done writing either a scripted or declarative pipeline, click Apply at the bottom. This will save and check for any errors in the script.
Real world pipeline flow
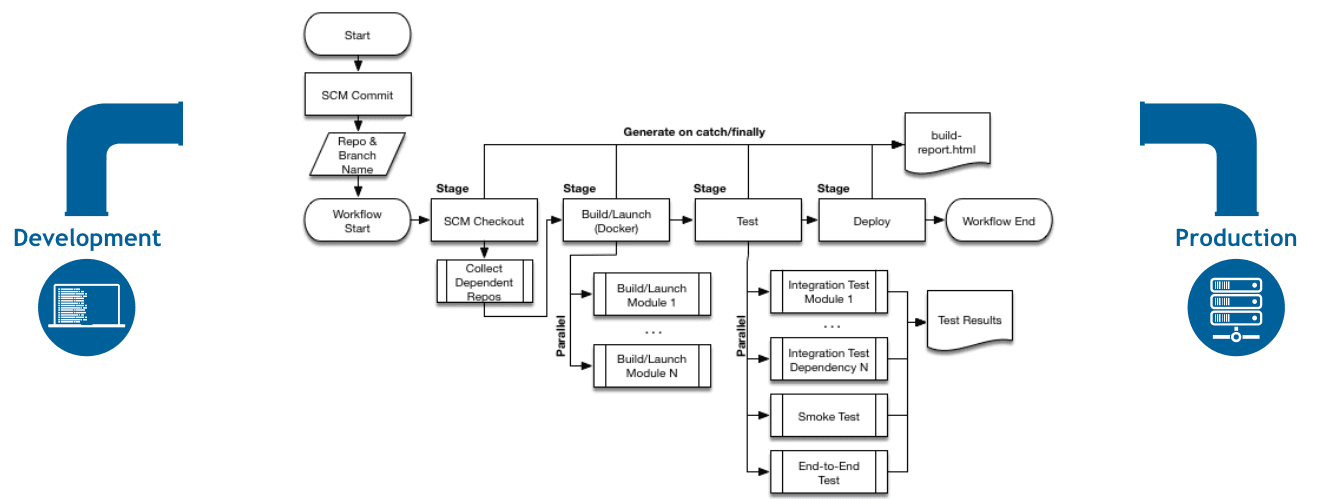
Source: www.jenkins.io
Variables
Variables allows you to use dynamic values in our pipeline scripts. Jenkins supports three types of variables:
-
Environment variables,
-
Current build variables
-
Parameters
Environment Variables:
Capital letters are used for all environment variable names in pipeline scripts as it is easy to identify them. Environment variables can bet set globally or locally. Environment variables which are declared at the beginning of the pipeline (at the top) are applied globally to all the pipeline steps and the ones declared in a stage are only used within that stage. Environment variables can be referred in different ways as shown below:
|
|
If you are using environment variable in a string, it should be prefixed with a $sign. You can also wrap the environment variable name in curly brackets {} which is optional.
In the below example, environment variables are declared globally.
|
|
Example of environment variables declared in a stage.
|
|
Here, when it runs Test stage it fails as environment variables are declared in Build stage. They are only available within that stage only. When we referenced them in Test stage it fails.
currentBuild Variables
currentBuild variables allow pipeline steps to refer to state of build while it is running. This variable is case sensitive. To access currentBuild variables properties, values are preceded by currentbuild.Nameofproperty. Properties are also case sensitive. Example:
|
|
Just like environment variables, currentBuild variables also preceded by a $ sign when used in a string. In order to view all currentBuild variables, go to pipeline script in Jenkins and click on pipeline syntax option at the end of the page. This will open pipeline syntax page. Click on Global Variables Reference option to the left and scroll down which says currentBuild variable reference.
|
|
Parameters
Parameters are also type of variables that get their values when the job is triggered. They are defined in a parameters block, which is placed at the beginning of the pipeline code and are accessed by their name and a params prefix.
It should have a name, a default value and a description. Just like variables, they are written with capital letters to identify easily. If they are used in a string, they should have a $ sign at the beginning and entered with a curly braces.
There are 5 different types of parameters as explained below:
- string
A parameter of a string type, for example: parameters { string(name: 'DEPLOY_ENV', defaultValue: 'staging', description: '') }
- text
A text parameter, which can contain multiple lines, for example: parameters { text(name: 'DEPLOY_TEXT', defaultValue: 'One\nTwo\nThree\n', description: '') }
- booleanParam
A boolean parameter, for example: parameters { booleanParam(name: 'DEBUG_BUILD', defaultValue: true, description: '') }
- choice
A choice parameter, for example: parameters { choice(name: 'CHOICES', choices: ['one', 'two', 'three'], description: '') }
- password
A password parameter, for example: parameters { password(name: 'PASSWORD', defaultValue: 'SECRET', description: 'A secret password') }
When using string and text parameters, users are entered with a text box to enter the parameter details when the pipeline is executed. When using boolean parameter, users are prompted with a true or false prompt. When using choice users are prompted with a list of options. With choice, default value is not needed.
Sample parameter script:
|
|
Suggested Article
Now that you know about Jenkins pipeline, continue reading our other article Jenkins variables and parameters here. All other DevOps categories are listed here: DevOps Tools. Have a look at the posts as per your topic of interest.
Conclusion
In this tutorial, we’ve explained what is Jenkins Pipeline and its basic usage. We’ve also demonstrated examples for all the topics that are discussed. We hope you have learned something new in this article.
With this knowledge on Jenkins pipeline, would you use Jenkins pipeline or a free style project in your Jenkins? Let us know in the comments section below.
-
Pipeline-as-code is defining your build and release pipelines as a file that is stored in source control system. Your build definitions are stored at the same source control system where you have your application source files. ↩︎
Your inbox needs more DevOps articles.
Subscribe to get our latest content by email.