
Managing Multiple Git Accounts on Same Computer
Detailed steps to configure multiple git accounts on same computer
Website Visitors:Managing multiple accounts on a single computer can be a difficult task, especially if those accounts are associated with Git. If you have multiple git accounts and need to switch between them regularly, it can be time-consuming and tedious. Fortunately, there are several methods that you can use to easily manage these multiple git accounts on the same computer. You can switch between your different git accounts with just a few clicks or keystrokes. This guide will discuss some of the most effective methods for managing multiple git accounts on the same computer.
First of all: SSH or HTTPS
As Git does not cache credentials, if you use HTTPS, you have to enter credentials every time you perform a clone, pull or push. On the other hand with SSH, you set it up once and forget about relogging in again and again. However if you have setup passphrase (explained later), you have to enter your passphrase everytime you run a git pull or push.
SSH keys are comprised of public key and private key which are linked cryptographically. Public key is shared with all the parties where ever you use it. It is used to encrypt messages that can only be decrypted using its corresponding private key.
Inorder to secure the whole connection, private key should be kept secret and should not be shared. The strength of the whole SSH connection lies in the fact that private key is not shared, as it is the only component that is capable of decrypting the messages that were encrypted using its own public key. You can learn more about SSH protocol here.
Prerequisites
For this demo, we are using Windows 10 and Ubuntu 22.04 machines. In order to install ssh commands in your Windows 10 machine, search for Manage optional features and select OpenSSH Client option and install it. ssh commands required for this activity are already available in Ubuntu.
In order to easily recognize the SSH keys we will use the keyword ssh_Personal for our personal GitHub account and ssh_Work for work (or your company) related GitHub account.
Let’s look at the steps in detail.
Multiple Git accounts in Windows 10
High level overview
On high level, you have to create an SSH key on your local machine, add them to ssh agent and copy the public key to your GitHub account.
Pictorial representation of what you are going to create:

You have to create two folders: one for work git account and other for personal git account. You have to initialize git in both the folders and add the SSH key file in both the folders using Git config -e command. Next run git remote commands to point to your appropriate git folders.
Generate SSH key
Run the below command to generate a SSH key.
ssh-keygen -t ed25519 -C "Personal_Email@email.com" -f c:\users\user01\ssh_Personal
-t parameter is for specifying the algorithm used for key generation. Possible values are “rsa”, “dsa”, and “ecdsa”. The default is “rsa”.
-f parameter is for specifying the output key file.
-C is for adding a comment. It can be anything but it will be easy to identify an account with email address.
Run the same command with your work details or email as shown below:
ssh-keygen -t ed25519 -C "Work_Email@email.com" -f c:\users\user01\ssh_Work
Add a passphrase
Once you run the above command, you will be prompted to enter a passphrase. This is optional but highly recommended to do so because if someone gets access to your computer, your keys will also be compromised without a passphrase.
If you have created a SSH key without passphrase, you can add passphrase later using below command. After you run the command, you will be prompted to enter a passphrase which will be added to your existing SSH key.
ssh-keygen -p -f c:\users\user01\ssh_Personal
SSH keygen command will generate two files: ssh_Personal and ssh_Personal.pub.
ssh_Personal is your private key stored on your machine, and ssh_Personal.pub is the public key which you will provide GitHub with.
Run the above command to generate SSH keys for your work related GitHub account. By now, you should have 4 files: ssh_Personal, ssh_Personal.pub, ssh_Work, ssh_Work.pub.
Add keys to GitHub account
Follow below steps to add your key to GitHub account.
-
Go to your GitHub Account Settings - Login to GitHub.com portal, click on your icon on top right and click Settings option to do so.
-
Click “SSH and GPG Keys” option.
-
Under SSH keys option, click New SSH key.
-
Enter a title of your choice, select Authentication Key as Key type and paste the content of ssh_Personal.pub file content in the Key column.
-
Click Add SSH Key option. Enter GitHub password if prompted.
Create new SSH key and add your ssh_Work.pub file content as well.
Add new keys to Git config file
Navigate to the folder you want to create a copy of your git repo and initialize it (Ex: C:\Personal folder). Run git init command for the same.
Next run the command git config -e. This will open the git configuration file in the editor you selected while installing git software. If you want to change it to nano for example, run the command: git config --global core.editor "nano -w". Full list of commands are given in this article. After you run git config -e command, it will open the config file. In that file, you will find [core] section. Add sshCommand = ssh -i c:/users/user01/ssh_Personal at the end of [core] section. Change the file path as per your folder structure.
Add email id and your name to git config if you haven’t done so already.
|
|
We are not using –global parameter as we don’t want to use same name and email to our work and Personal Git profiles.
git config -e is different for different git initialized folders. It is not a global single file that all git folders in your machine reads the config data from.Perform above steps for your work GitHub account as well ie., create c:\Work folder and run git config -e command. In the git configuration file, add sshCommand = ssh -i c:/users/user01/ssh_Work at the end of [core] section. Change the file path as per your folder structure. As this is a complete different git account, change git user’s email and user name.
|
|
Navigate to C:\Personal and C:\Work folders and run git config --list command in each folder to see the username and email details. You will find two different emails and two different user names in the config details.
Push to repository
In your GitHub profile, create a new repository called Test-Git-Repo.
On your local machine, create a folder:
|
|
Create a new empty file (testfile.txt) in C:\test folder and push to GitHub. Navigate to C:\Personal folder and run below commands:
|
|
Navigate to your repository in GitHub portal and click on code button (in green) and select SSH tab. Copy the git url and paste it in the remote add command above.
Repeat the process for your GitHub Work account ie., Navigate to C:\Work, create a directory, a file, add it to git, commit it and push it.
There are different ways you can add remote repository:
|
|
|
|
|
|
From now on, to ensure that our commits and pushes from each repository on the system uses the correct GitHub user — we will have to configure user.email and user.name in every repository freshly cloned or existing before.
To do this use the following commands.
|
|
Pick the correct pair for your repository accordingly. Now you can use Git Pull or Git Push.
Multiple Git accounts in Ubuntu
Create SSH keys
Open terminal in Ubuntu machine and run below commands to create private key and public keys for your personal and work GitHub accounts in ~/.ssh folder.
ssh-keygen -t ed25519 -C "Personal_Email@email.com" -f ~/.ssh/ssh_Personal
ssh-keygen -t ed25519 -C "Work_Email@email.com" -f ~/.ssh/ssh_Work
Add keys to GitHub account
Follow below steps to add your key to GitHub account.
-
Go to your GitHub Account Settings - Login to GitHub.com portal, click on your icon on top right and click Settings option to do so.
-
Click “SSH and GPG Keys” option to the left.
-
Under SSH keys option, click New SSH key.
-
Enter a title of your choice, select Authentication Key as Key type and paste the content of ssh_Personal.pub file in the Key column.
-
Click Add SSH Key option.
Login to your work GitHub account, create new SSH key and add your ssh_Work.pub file content. Make sure you login to two different GitHub accounts and paste the pub file contents by creating new SSH keys.
Create config file
Create a file called config in your .ssh folder in your profile. Navigate to .ssh folder by running the command on terminal, cd ~/.ssh. Run touch config to create an empty file called config. Next run nano config to open that file in nano editor. Using the template below, update your details and save the file.
|
|
This config file contains:
-
Host (github.com-GitUserName. In this example both git accounts are in GitHub.com. If we only use github.com as host value, Git looks for the first host value details in config file everytime. In above example, we’ve used personal account first. So, it will try to authenticate with your personal Git account first no matter you are in Personal git folder or work git folder. Inorder to separate that, we’ve used github.com-username)
-
Hostname (github.com)
-
user id (Your GitHub account userid)
-
Identity File (your SSH file path)
Register new SSH keys with ssh-agent
Before you use the keys, you have to register them with ssh-agent on your Ubuntu machine. Add the keys to ssh-agent by running below commands. Enter passphrase when prompted.
|
|
ssh-agent /bin/sh and then ssh-add ~/.ssh/ssh_Personal, once again making sure to replace the name of the key. Perform the same step for ssh_Work SSH key as well.Cloning repositories
Now that all the required configuration is in place, we can go ahead and clone the repositories. On cloning, we have to use the hostnames that we’ve used in SSH config. In your local machine, install git by running the command: sudo apt install git. Create a new folder for your personal git repository and your work repository.
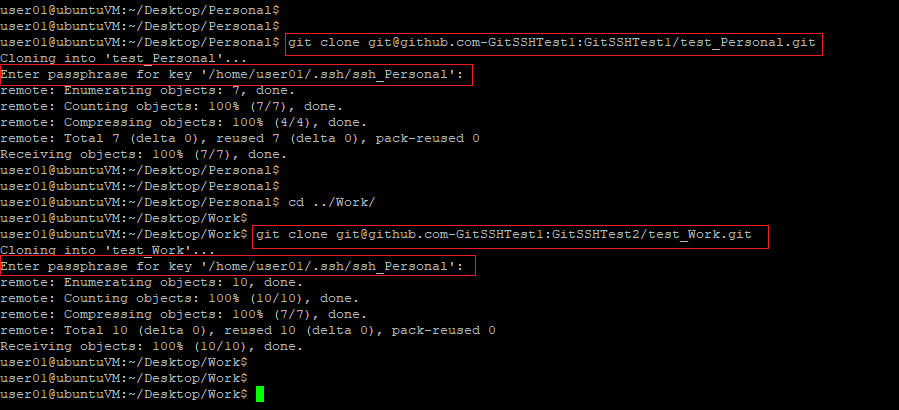
Navigate to your git personal account folder and run git clone command, git clone git@github.com-GitSSHTest1:GitSSHTest1/test.git to clone your personal git account. Enter the passphrase of the SSH key when prompted. As we have used github.com-GitSSHTest1 in the config file, this command will run without any errors.
Similarly for your work GitHub account run, git clone git@github.com-GitSSHTest2:GitSSHTest2/test.git. Enter the passphrase of the SSH key when prompted. Note that github.com-GitSSHTest1 and github.com-GitSSHTest2 are used in the config file and we are using the same in git clone command.
Configure username and email locally
Navigate to your personal git folder and set your username and email with below commands. Replace with your Git username and email below. Follow the same for your work git folder as well.
|
|
ssh-agent /bin/sh and then ssh-add ~/.ssh/ssh_Personal, once again making sure to replace the name of the key.From now on, you can add, remove or update content in your git folder. It will use the appropriate SSH key and the locally set username and email for all pull and push requests.
Point to consider while setting up username and email
Once you clone or create local Git repositories, set the username and email exactly as needed. GitHub recognizes author of any commit from email id attached with the commit description.
To view the username and email, run git config --list command. If you want to change username or email, run the below commands.
|
|
Remote add repositories
Finally, we have to setup a remote so that Git uses it when we use push or pull. Make sure to use correct username and email in the respective folders. To push or pull to the correct account we need to add the remote origin to the project.
 git remote add origin git@github.com:GitSSHTest2/test_Work.git

 git remote add origin git@github.com:GitSSHTest1/test_Personal.git
If you endup in any errors when executing above commands, add username in the command as: git remote add origin git@github.com-GitSSHTest2:GitSSHTest2/test_Work.git. Follow the same for your personal git account as well.
Now you can use:
 git push
 git pull
Using GitHub Token Method
- Login to GitHub.com and go to the
settings > developer settings > personal access token - click on
fine-grained tokensoption and click onGenerate a new tokenoption.
Now use the following command:
|
|
You can run Git pull, push from now on.
Using Git Clone Method
Open Git bash console and run the command:
git clone https://username:password@github.com/username/repo_name.git
This will clone the remote repository into your current folder.
If you do not want to specify password in the console, run the below command on Git bash console.
git clone https://username@github.com/username/repo_name.git
Enter your password when prompted.
If you do not want to use the same user name and email, use below commands to set a different username and email.
|
|
Suggested Article
If you need Git refresher, check our Git Basics article here. All other DevOps categories are listed here: DevOps Tools. Have a look at the posts as per your topic of interest.
Conclusion
In this article, we’ve explained different ways in adding multiple Git accounts on same computer. We’ve also demonstrated examples for all the topics that are discussed in the article. We hope you have learned something new in this article.
Please feel free to share your thoughts about this article in the comments section below.
Your inbox needs more DevOps articles.
Subscribe to get our latest content by email.